Brian Schiff’s Blog
Injury Prevention, Sports Rehab & Performance Training Expert
Research along with years of observation has taught me that the brain is inherently looking for the most efficient way (aka least effort) to execute movement in life. In addition, it HATES pain just like you and I so it does everything possible to avoid it including ordering the body to perform dysfunctional movement patterns.
After a painful episode, the brain often needs reminded that the body can go back to the proper movement patterns once the pain is gone. However, it often holds that painful memory and may by default lean toward a faulty movement pattern. This protective mode then ends up perpetuating a faulty movement pattern that is no longer necessary nor efficient. Over time, dysfunctional movement patterns can create further stress or harm to other segments in the kinetic chain.
So, I am always seeking ways to stimulate the body to work properly and exercises that facilitate proper neuromuscular patterning are instrumental in my rehab and training. I wanted to share two exercises that I like to utilize in my rehab and training for the shoulder. In particular, I like to employ closed chain activity to stimulate the serratus anterior as well as the other scapular stabilizers.
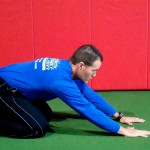
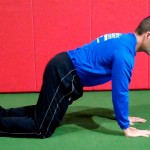
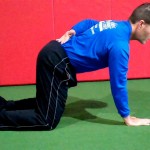
Below are two exercises I wrote about in my “Functionally Fit” column for PFP magazine. The first exercise shows quadruped rocking. Shirley Sahrmann mentions this in her work, Diagnosis and Treatment of Movement Impairment Syndromes. I began using it after reading her book, and I agree that it works very well for scapular dysfunction. Below is the start and finish position for the quadruped version as well as my own advanced tripod version of the exercise.
- Quadruped start
- Quadruped finish
- Tripod finish
For a complete explanation of the exercise and its application, click here to read the column.
As a follow-up to this exercise, I included an unstable progression I like to employ using the BOSU trainer. I call this the unstable tripod scapular clock. It can be done on the knees or up on the toes. I have included a quick video on this below. Again, I like this exercise for scapular work as well as core stability training.
Click here to read my PFP column on this exercise for the full description, application and regressions. The real beauty of this last exercise is the “big bang for your buck” attributes since it hits shoulder, core and hip stability all at once for those able to work at that level. I hope it works as well for you as it has for me!
I think most people involved in health and fitness are up to speed on the move to address mobility and stability at the hip as an integral part of our assessments and exercise prescription. I know in my practice I see lots of issues with both a lack of hip stability and mobility.
As I learn, practice and evolve as a professional, I find myself looking for more bang for my buck with exercises. A few themes and trends in my own training include:
- Increasing emphasis on body weight exercises
- More and more single leg training
- Integrated movement patterns versus isolation
So, if you are familiar with Gray Cook and Mike Boyle (I am specifically referring to their writing and discussion on the joint by joint approach) you know that they advocate for increasing mobility at some joints and gaining stability at others. Ironically, the hip has a need for more of both depending on the movement and individual imbalances.
So, I really enjoy exercises that provide some of each and meet the trends I referenced above. I just released one such hip exercise in my “Functionally Fit” Column in PFP Magazine. I call it the RDL Hip Driver.


Click here to read the entire post with a full description of how to perform the exercise and its functional application.
First off, I want to extend warm Holiday wishes to all of you reading this blog!! As I sit at home on Christmas Eve morning, I am quietly reflecting back on a big year of accomplishments and changes I experienced in 2010. It is often hard to take time to appreciate your blessings, Because as a society we are driven to conquer the “next thing.” However, I have been trying to get better at taking time to savor life’s victories.
Last year, I ran my first marathon (thankfully under 4 hours despite horrible cramps), sold my successful 10 year-old fitness business in Ohio, and moved to North Carolina to tackle a new venture at the Athletic Performance Center. The past year has truly been full of many changes and blessings.
Over the years, I have come to realize that the real gift in my profession is being able to help others. For me, I have an ability to reach consumers through my rehab and performance training, as well as my peers through blogging, speaking and products. If you read my blog, I hope that I have been able to help you even if it is only in the smallest way.
As I look ahead to 2011, I am excited for new opportunities and feel like it will be a big year of learning and exploration for me. That will translate into more sharing on this blog and in my monthly Training & Sports Medicine Update Newsletter. I am continuing to write for PFP Magazine through my online column and will share my latest post with you today on crossing lunges.
Performing a crossing lunge presents unique challenges to the body – challenges which often exploit muscle imbalances, mobility issues, and balance deficits. It is a rotational activity that is more challenging then it may appear.
I once had an athletic trainer question the safety of them in an exercise class I was teaching. She thought they were harmful for the meniscus in the knee. Hmmm…. If that is true , why would I do them? Well, like any exercise you do in the gym, there is always risk of an injury IF you do the exercise improperly. That is a key takeaway point. For the record, I never recommend an exercise I think is dangerous – in most cases it simply comes down to form and knowing your limitations.
Crossing lunges are very effective in strengthening the entire lower body, but particularly the hips. Whether choosing the backward or forward variation, they call for hip internal/external rotation, knee stability and ankle mobility. Beyond that, they are very functional for sport and athletic movement.
Think about field or court sports for a minute. How many times does an athlete cross over to dribble, scoop up a ball or evade a tackle? You may see the forward variation more, but the backward variation is seen as well with drop steps, pivot motions and even along the baseline in tennis.
So, if you train athletes or are an athlete, this is a great example to keep in your personal exercise tool box. I have included pictures of the forward and backward version below. See the link below the photos for my full column and explanation of how to do the exercise properly.
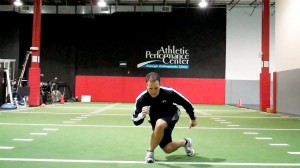
Backward Crossing Lunge (onto right)
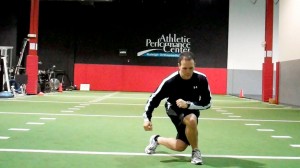
Forward Crossing Lunge (onto right)
Click here to read my full online column, Functionally Fit, pertaining to this lunging exercise. Thanks for reading this, and I wish you all the best in the year to come!

