Brian Schiff’s Blog
Injury Prevention, Sports Rehab & Performance Training Expert
Many athletes and clients I work with lack adequate pillar and shoulder stability. Whether this is related to acquired laxity, inherent instability or simply a lack of proper muscular control, I think it is important to assess baseline stability in anyone performing overhead lifts, ballistic upper body training and in overhead athletes.
In my clinic, I work with lots of baseball players, swimmers and volleyball players. Most females tend to struggle with hyper mobility (loose shoulder joints) whereas many of my males tend to have soft tissue tightness and in some cases limited internal rotation (GIRD). Both males and females tend to have a need to improve dynamic shoulder and pillar (core) stability to reduce injury risk and optimize mechanics.
The following exercise is one I use to both assess anti-rotational control/stability as well as train the body to resist torsional forces. In the video below, you can see how to assess your baseline strength and stability.
This exercise is very effective in working improving glenohumeral and scapular stability as well as enhancing shoulder, torso and hip stability. In my opinion, athletes with poor stability in this assessment should not perform unilateral Olympic lifting or ballistic overhead training as they may lack the necessary neuromuscular control to execute the proper movement pattern.
Improving lateral chain strength is always a priority when training or rehabbing athletes. Improving anti-rotation stability is particularly important for injury prevention and dissipation of forces in the transverse plane. Whether working with a post-op ACL client or training an overhead athlete, I am always seeking ways to increase torso/pillar stability to increase efficiency of movement and reduce injury risk.
This video below from my Functionally Fit series for PFP Magazine will demonstrate a great exercise do accomplish these training goals.
Emphasis should always be placed on maintaining alignment. Do not progress the load too quickly, and be cautious if using the fully extended down arm position if clients have a history of shoulder instability or active shoulder pathology as this places more stress on the glenohumeral joint. Below are some progressions and regressions as well:
Regressions
1. Decrease the hold time as needed to maintain form and alignment
2. Allow the kettlebell to rest against the right dorsal wrist/forearm
3. Stack the top foot in front of the other foot as opposed to stacking them on top of one another to increase stability
4. Bend the knees to 90 degrees to reduce the body’s lever arm
Progressions
1. Increase the weight of the kettlebell and/or increase hold time
2. Lift the top leg away from the down leg
3. Add light perturbations to the top arm during the exercise to disrupt balance and challenge stability
4. Perform the exercise with the down arm fully extended
Rotational stability within the shoulders, torso and hips is critical for optimal performance in sport and injury prevention. Often, clients will exhibit asymmetries with respect to trunk stability with pillar assessments and the Functional Movement Screen (FMS). I often see 2/1 scores on the RS. Addressing any asymmetry is important for athletes and weekend warriors involved in cutting, pivoting, and rotational sports.
There are several exercises that can be used to increase rotary stability. One exercise I recently featured for PFP Magazine in my online column, Functionally Fit, uses a bottoms-up kettlebell hold with trunk rotation to accomplish this. This particular exercise can be used to increase anti-rotation strength and improve rotary stability. The pictures below illustrate a knee bent (beginner) and knees straight (advanced) version of the exercise.
The knee bent position allows for easier control of the lumbar spine while keeping the shoulder blades flat on the floor. cadence should be slow and deliberate avoiding momentum that may be caused by gravity. Once this variation becomes easier, progress to the straight knee version below.
Form is everything here so be sure to use a weight that you can control, while slowly lowering the legs each direction. This movement pattern blends in nicely with movement prep/pillar prep activities that work on hip disassociation as well.
Click here to see my video and full column for PFP Magazine on this exercise.
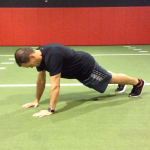
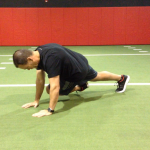
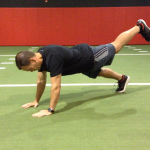
Increasing shoulder, torso and hip strength and stability is a common training goal for athletes involved in sport. Facilitating hip disassociation and kinetic chain linking with exercise is always a plus. I like to use a diagonal mountain climber with hip extension to accomplish these objectives. More specifically, I utilize this exercise with my overhead athletes and anyone involved in cutting, pivoting and rotational sports.
Begin in a tall plank position. The hands should be beneath the shoulders with the feet on the floor and shoulder width apart. Slowly bring the left knee/hip under the body and toward the right elbow. Pause at the end point prior to losing form or control.
Next, return the left leg toward the start position and up into full hip extension in one continuous movement. Pause at the top end of available hip extension and repeat the cycle for 10 repetitions or time on the same leg. Alternate legs and perform 2-3 sets on each side.
Sufficient upper body strength and core/hip stability in a 3 point position is necessary to perform the exercise correctly. At no time should the foot of the moving leg touch the floor or be used to balance the body. As far as a pace, I feel using a 1/1/1/1 cadence works best.
This exercise is an excellent way to promote shoulder, core and hip stability while facilitating hip disassociation as well. Driving the hip back up into extension will activate the gluteals and simultaneously force the stable (fixed) hip to stabilize the pelvis and counterbalance the movement pattern. In addition, the client will have to effectively activate the hip and abdominal musculature throughout to avoid unwanted pelvic tilt/rotation during the movement.
Click here to view the full video of this exercise I did for my ‘Functionally Fit’ column for PFP Magazine.
I like to include exercises on this blog that are useful for rehab and fitness professionals as well as fitness enthusiasts who visit. This is a cool exercise that a colleague taught me. I also recently shared this as part of my ‘Functionally Fit’ column for PFP Magazine. It works great when doing partner workouts or if coaching a client. We used it during our off season training for the Carolina Hurricanes and it is much harder than it looks on the surface.
Training clients to maintain core stiffness in athletic functional positions will improve performance and reduce injury risks for the spine and lower extremities. This exercise is an effective way to address postural stability, increase core strength and enhance kinetic chain proprioception

Execution
Begin in a split squat position holding a stability ball overhead. The client maintains an isometric split squat while the coach/trainer provides directional perturbations in an attempt to disrupt balance and stability.
You may opt for several quick rhythmic perturbations or elect to use more sustained pushes (1-2 seconds in each direction) to challenge the client. Allow the client to reset to the desired position if he/she does lose balance in order to facilitate optimal motor patterning. Perform 30 seconds with the left leg forward, rest 30 seconds and then repeat with the right leg forward. Complete two sets on each side.
Be sure to observe asymmetries or deviations specific to either side as this will allow for better cuing and reveal energy leaks. Marking the desired distance between the front heel and rear foot toes with tape will ensure consistency for each trial side-to-side.


