Brian Schiff’s Blog
Injury Prevention, Sports Rehab & Performance Training Expert
First off, I want to extend warm Holiday wishes to all of you reading this blog!! As I sit at home on Christmas Eve morning, I am quietly reflecting back on a big year of accomplishments and changes I experienced in 2010. It is often hard to take time to appreciate your blessings, Because as a society we are driven to conquer the “next thing.” However, I have been trying to get better at taking time to savor life’s victories.
Last year, I ran my first marathon (thankfully under 4 hours despite horrible cramps), sold my successful 10 year-old fitness business in Ohio, and moved to North Carolina to tackle a new venture at the Athletic Performance Center. The past year has truly been full of many changes and blessings.
Over the years, I have come to realize that the real gift in my profession is being able to help others. For me, I have an ability to reach consumers through my rehab and performance training, as well as my peers through blogging, speaking and products. If you read my blog, I hope that I have been able to help you even if it is only in the smallest way.
As I look ahead to 2011, I am excited for new opportunities and feel like it will be a big year of learning and exploration for me. That will translate into more sharing on this blog and in my monthly Training & Sports Medicine Update Newsletter. I am continuing to write for PFP Magazine through my online column and will share my latest post with you today on crossing lunges.
Performing a crossing lunge presents unique challenges to the body – challenges which often exploit muscle imbalances, mobility issues, and balance deficits. It is a rotational activity that is more challenging then it may appear.
I once had an athletic trainer question the safety of them in an exercise class I was teaching. She thought they were harmful for the meniscus in the knee. Hmmm…. If that is true , why would I do them? Well, like any exercise you do in the gym, there is always risk of an injury IF you do the exercise improperly. That is a key takeaway point. For the record, I never recommend an exercise I think is dangerous – in most cases it simply comes down to form and knowing your limitations.
Crossing lunges are very effective in strengthening the entire lower body, but particularly the hips. Whether choosing the backward or forward variation, they call for hip internal/external rotation, knee stability and ankle mobility. Beyond that, they are very functional for sport and athletic movement.
Think about field or court sports for a minute. How many times does an athlete cross over to dribble, scoop up a ball or evade a tackle? You may see the forward variation more, but the backward variation is seen as well with drop steps, pivot motions and even along the baseline in tennis.
So, if you train athletes or are an athlete, this is a great example to keep in your personal exercise tool box. I have included pictures of the forward and backward version below. See the link below the photos for my full column and explanation of how to do the exercise properly.
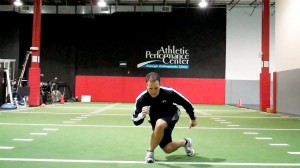
Backward Crossing Lunge (onto right)
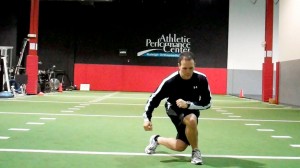
Forward Crossing Lunge (onto right)
Click here to read my full online column, Functionally Fit, pertaining to this lunging exercise. Thanks for reading this, and I wish you all the best in the year to come!
I hope you enjoyed part one in this series. Part two looks at a frontal and transverse suspended reach. This is a great way to train the body to better resist shear forces that are encountered in sport.
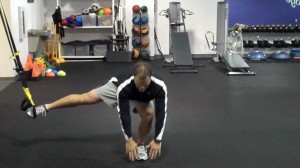
To read more about this progression and see the rotational component, click here. This exercise is a great way to improve hip strength and improve de-rotational capacity, thereby reducing injury risk with planting, cutting and pivoting.
Throughout my speaking and training, I advocate single leg strengthening. Additionally, I try to incorporate balance and stability training progressions that target common muscle imbalances and reduce injury risk.
It is common knowledge that the hip can often affect the knee. Likewise, the foot and ankle complex can also impact the knee. Single leg training often exposes and corrects limb deficiencies and simulataneously improves function and performance.
I have been producing a TRX functionally fit mini-series for PFP magazine. The first two editions focus on single leg suspension reaching progressions. I thought I would share those with you as there may be portions you can apply to your own training or to others.
I use these progressions with runners, court and field athletes, and general clients alike. They work the entire kinetic chain and emphasize anti-gravity control in multiple planes. These progressions can be part of an advanced rehab regimen or fitness program. Below is a picture of the phase one sagittal plane reach:
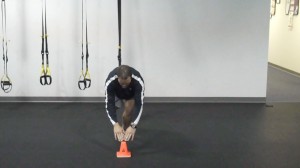
To see the entire progression (part 1), check out my column by clicking on the image below.
So, if you know me well at all, you know my first “law of exercise” is to ALWAYS know why you do what you do. I read a newsletter by Mike Boyle yesterday. He talked about being a cook or chef when it comes to exercise. He advises those with less than 5 years of expereicne not to mess with the recipe much so to speak. Since I have been doing this for 12 years, I consider myself to be much more of a chef.
I am constantly creating and tweaking my programming to deliver the best results. So, when I decide to use a training aid or piece of equipment, I have to believe in it 100%. My athletes and adult clinets alike love bands, vests, balls and training toys if you will.
But, I have to remind them (and myself at times) that the training aid exists only to further advance the original exercise or its desired outcome. Using these things just for variety is not really a sound plan. Today, I have a short video for you that reveals four progressive ways to use the Thera-band stability trainer.
I have used this in the rehab setting and in my fitness programs with great success. Please note – all of the exercises I show you should be mastered on flat ground first. After that, the stability trainer adds a great new dimension to the exercises and provides a very natural disturbance to balance and stability throuhg the kinetic chain that exists in sport and life.
Now, these are a just a small sampling of some of my favorite Thera-band trainer drills. The cool thing about this item is that it comes in three different levels of difficulty moving from green (easiest) to black (hardest). I tend to prefer the blue as it is middle of the road, making it easy enough for those without the skill of an Olympian and yet challenging enough for even the more advanced athletes. However, starting with the green may be necessary for those with ankle/knee instability or limited experience with stability training.
You can grab your very own blue Thera-Band trainer in my OpenSky Shop. Click the image below to head on over and get free shipping for a limited time as well.

