Brian Schiff’s Blog
Injury Prevention, Sports Rehab & Performance Training Expert
I am a big proponent of cryotherapy in my rehab whether dealing with acute or even more chronic inflammation. I routinely use cryotherapy with compression via Game Ready in the clinic for post-op knee surgeries, ankle sprains, rotator cuff pathology, Little League shoulder, labral repairs, etc. I was recently contacted and asked to review a cryotherapy solution on the market – Power Play. Full disclaimer: I am not affiliated with POWERPLAY in any way nor was I paid to write this review.
My intent in writing this review is to share information about the product itself and its efficacy for use in the clinic as well as for the general public. Power Play shipped me the standard kit which includes a carrying case, the cold compression ankle and knee wrap as well as the pump and wall charger. The entire package is easily portable for the ATC on the go, and works well in the clinic because it has three ports on the unit making multiple treatments for patients with various body parts a cinch.
Below is a picture of one of my patients recovering from ACL reconstruction using the knee wrap:
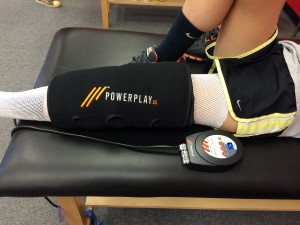
The different body part sleeves include gel wraps that attach to the sleeves via velcro along with a stocking to protect the skin from the wrap. POWERPLAY advises placing the wraps in the freezer or refrigerator prior to use. I noticed that if you place them in the freezer and pull them out for immediate use they are stiff and do not conform as well as desired to the body. As such, I would advise taking them out at least 10-15 minutes prior to use.
In terms of compression, the default setting on the display reading is 50 mmHg of compression. You can increase compression in 5 mm increments up to 70 mmHg. This is easily done with the touch of a single button. The compressor runs for 20 minutes and then shuts off on its own, so if you desire lass than 20 minutes you would need to set a timer (not a big deal).
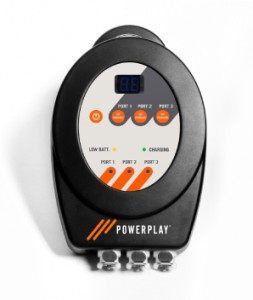
POWERPLAY pump
Overall, the unit is convenient to take on the road and very easy to use. The company states it will run the unit for 8-12 hours on one charge, and I find this to be accurate so far. Patient feedback is that they like the wraps and the level of pressure, and they are comparing it to the traditional GameReady clinic cryotherapy I use with them on a routine basis. The POWERPLAY unit is also definitely cold enough and comparable to all other forms of cryotherapy we have in the clinic.
I find the entire package is reasonably priced for the overall quality and portability of the product. I think it would be a worthwhile investment for PT clinics, ATCs on the go and a client looking to have a high quality cryotherapy solution at home while recovering from an injury or surgical procedure. I have long been a fan of cold and compression so I like this product, and I look forward to trying out their shoulder wraps next! Click here to learn more about POWERPLAY.
I must admit that I am always looking for new ways or tools to enhance my practice and work as a sports physical therapist. I recently completed the necessary hours of training to perform dry needling in the state of North Carolina. I trained with Myopain Seminars and have nothing but great things to say about their courses.
For those unfamiliar with trigger point dry needling (TDN), it is a treatment gaining traction in the therapy world. Dry needling is a treatment that involves a very thin needle being pushed through the skin to stimulate a trigger point. Dry needling may release the tight muscle bands associated with trigger points and lead to decreased pain and improved function for those suffering from pain related to muscular dysfunction.
Trigger points may ultimately refer pain to other sites, and research indicates that TDN can reduce acidity in the muscle and clear out pain propagating chemicals. The picture below is an example of me performing trigger point dry needling to the upper trapezius of a 16 y/o female.

This particular client had been suffering from an inability to lift the arm above shoulder height and marked shoulder pain since September 2013. She also mentioned having headaches at school. Clinically, she was diagnosed with multi-directional instability and scapular dyskinesis by the referring MD. We began working on a scapular stabilizer and rotator cuff strengthening program in late November that was helping to diminish pain and increase function. However, she continued to c/o pain in school, stiffness and headaches.
The shoulder mobility screen in the FMS often reveals side-to-side asymmetries. It is more common to see hypermobility in female clientele, while their male counterparts exhibit more hypomobility. Overhead athletes tend to demonstrate excessive horizontal external rotation and a relative loss of internal rotation on the dominant side. This hypomobility can be detrimental to overhead athletes and increase risk for overuse injuries if it becomes excessive.
The following exercise is an effective way to improve shoulder mobility and optimize function. One important point is to focus on form and move very deliberately through the motion.
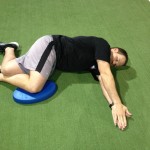
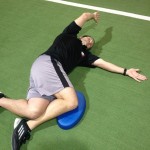
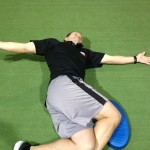
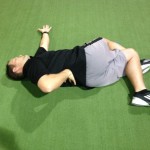
Execution: Begin lying on the floor face up. Bend the left knee up to 90 degrees and cross the right leg over top of the left interlocking them. Roll to the left side and pin a folded towel or pad between the right knee and the floor. Place the arms in 90 degrees of shoulder flexion with the right on top of the left in an outstretched position. Next, slowly sweep the right arm up overhead and around the body as you attempt to place the torso/back on the floor. The finish position for the right arm will be reaching the right hand and arm up behind the back.
Exhale as you perform the sweeping motion and hold the end position for 2 seconds. Reverse direction and return to the start position. Perform 5-10 repetitions on each side.
Application: Limited shoulder mobility is a common finding, especially among male clientele with tightness in the pecs, lats and posterior shoulder. Asymmetry with respect to mobility is common with greater difficulty found trying to reach the dominant arm up behind the back on the FMS shoulder mobility screen. This exercise will help improve thoracic spine motion and shoulder mobility. The focus should be on strict form and proper stabilization to avoid unwanted motion. Pinning the pad (or towel roll) to the floor will help ensure better stabilization.
If hypomibility is an issue and clients score a 1, foam rolling the pec minor/major, latissimus dorsi and the posterior rotator cuff musculature prior to performing the exercise will be helpful. Stability training can be added in later once the soft tissue mobility restrictions and movement pattern is improving.
In the past, I wrote a post about Crossfit and shoulder pain based on a 38 y/o male client of mine. Click here to read that post. In my prior entry, I discussed differential diagnosis of rotator cuff and labral pathology, as well as my treatment approach for that client.
If you follow my blog, twitter feed or webinars, you know I treat a lot of Crossfit athletes. Recently, I worked with a 25 y/o female suffering from marked shoulder pain that was keeping her out of the gym.

Below are the key findings from her intake on 8/30/13:
- Onset of left shoulder pain on 8/8 related to snatches
- Right hand dominant
- Intermittent pain if sleeping on her left side
- Full AROM
- Mild weakness with supraspinatus and external rotation on left
- Positive impingement signs
- Positive O’Brien’s test (labral test)
- Positive sulcus sign bilaterally (indicates multi-directional instability or MDI)

Sulcus sign
Treatment intervention
- Rhythmic stabilization and PNF exercises
- Rotator cuff and scapular strengthening
- Closed chain stabilization training
- Game Ready (cryotherapy)
- Home program issued at visit #1
I saw the patient once per week and she did her home program for 4 weeks. At week 4, we gradually began allowing her to do some modified gym workouts but still no snatches or full overhead work. She was pain free at this time and all impingement/labral signs had resolved. At this point she returned to some wall ball drills (limited height) but still no snatches.
The client’s final visit was on 10/2/13. Her Quick Dash percentage of perceived shoulder dysfunction was now 0%. She was symptom free, but more importantly she had a great understanding of how to modify her lifts, loads and volume based on her multi-directional instability. She was now aware of how her instability impacts her shoulder in “at risk” positions and in the face of fatigue. This brings me to the primary reason for this second post related to Crossfit and shoulder pain.
In my initial post, I focused on overuse and shoulder inflammation as a result of poor mobility, muscle imbalances and a lack of physical preparedness to do high intensity exercise like Crossfit. On the other end of the spectrum lies the unstable shoulder.
Hypermobility and/or shoulder instability is a major problem for those doing Crossfit in light of the following:
- Many lifts and exercises put the shoulder in “at risk” positions
- Poor glenohumeral joint stability places more stress on the rotator cuff and long head of the biceps
- With the AMRAP approach and train to failure nature of the WOD, fatigue is a given and this means the stabilizing muscles that matter most will often fail leading to a much higher injury risk
Key Takeaways
- My client had secondary rotator cuff and bicipital irritation related to primary instability
- Rest and a combined stabilization and cuff/scapular strengthening exercise program was effective in resolving her symptoms within 30 days
- High load/high volume overhead lifts and those that place the shoulder at end range pose a higher injury risk for those with MDI or anterior instability
- Shoulder stability work trumps mobility work in those with shoulder instability – this often runs counter to traditional approaches that tend emphasize better mobility (one program does not fit all)
Closing thoughts
We must keep in mind that the shoulder is inherently unstable in order to allow us the freedom of movement necessary to perform the various tasks and exercise. With that said, repetitive movements and lifts can create micro and/or frank shoulder instability over time. Those with a history of shoulder subluxation/dislocation/instability are a high risk group to begin with. Adding high loads to failure places the shoulder in a fatigue and compromising state. As a coach, competitor or health professional, we must remember that even the best intentions and coaching can fail us if the risk of a lift outweighs the reward.
As I have said before, anyone who decides to do Crossfit MUST get a proper assessment prior to starting to reduce injury risk. Ideally, this assessment would begin with a full FMS to help uncover any mobility or stability issues and asymmetry. Keep in mind research reveals that females will almost always score a 3 on shoulder mobility and many may be hypermobile. Conversely, they tend to score lower (1 in many cases) on the trunk stability push-up. Any pain with screening would necessitate a referral to a PT or MD for further evaluation.
Trainers cannot be asked or expected to catch multi-directional shoulder instability. However, they can and should be aware of relative risk, anatomical tendencies and red flags that may predispose clients to injury. For those wanting to be the best in the business, I would suggest developing a system for assessing clients and partnering with allied health professionals like me to incorporate best practices in their business. Perhaps most importantly, trainers and coaches must be willing to adapt, limit, or eliminate exercise that does not fit the needs and abilities of the clientele.
The random nature of the WOD makes it difficult for unassuming clients to judge how best to fit in the Crossfit model if they have a dysfunction or injury concern. My goal is always to empower people with knowledge about their body and sound advice for optimal training. For those intent upon getting back to Crossfit after injury, I work hard to normalize their function and offer tweaks and modifications to prevent re-injury. Prehab is a must for this population. But in the end, some shoulders will simply not be able to handle the rigors and intensity of Crossfit.
Many people struggle with faulty posture (forward head and rounded shoulders). Tightness in the pec major or pec minor can negatively affect the body. Often, the throwers I see suffer from tightness in this region. Any overhead athlete can be affected as well as the person who sits and types all day long in the office.
The video below reveals how to use a trigger point ball and block to work on soft tissue tightness. I like the TP ball and baller block from Trigger Point for this exercise sequence.
For more information on this technique and its application, click here to read my online column for PFP magazine. Note: the final “W” motion in the video is not described in the column article, but it is another option that can be included.

